
The angle that keeps the belt working with the seat
A harness is not fitted by feel alone. Shoulder straps need to leave the seat at a line that supports the driver without dragging the harness down over the shoulders, and without forcing the belts to ride up when the car loads up in a corner or under braking. In many club cars that are used on track days and local sprints, the problem starts with the seat being mounted too high or too low for the belt path.
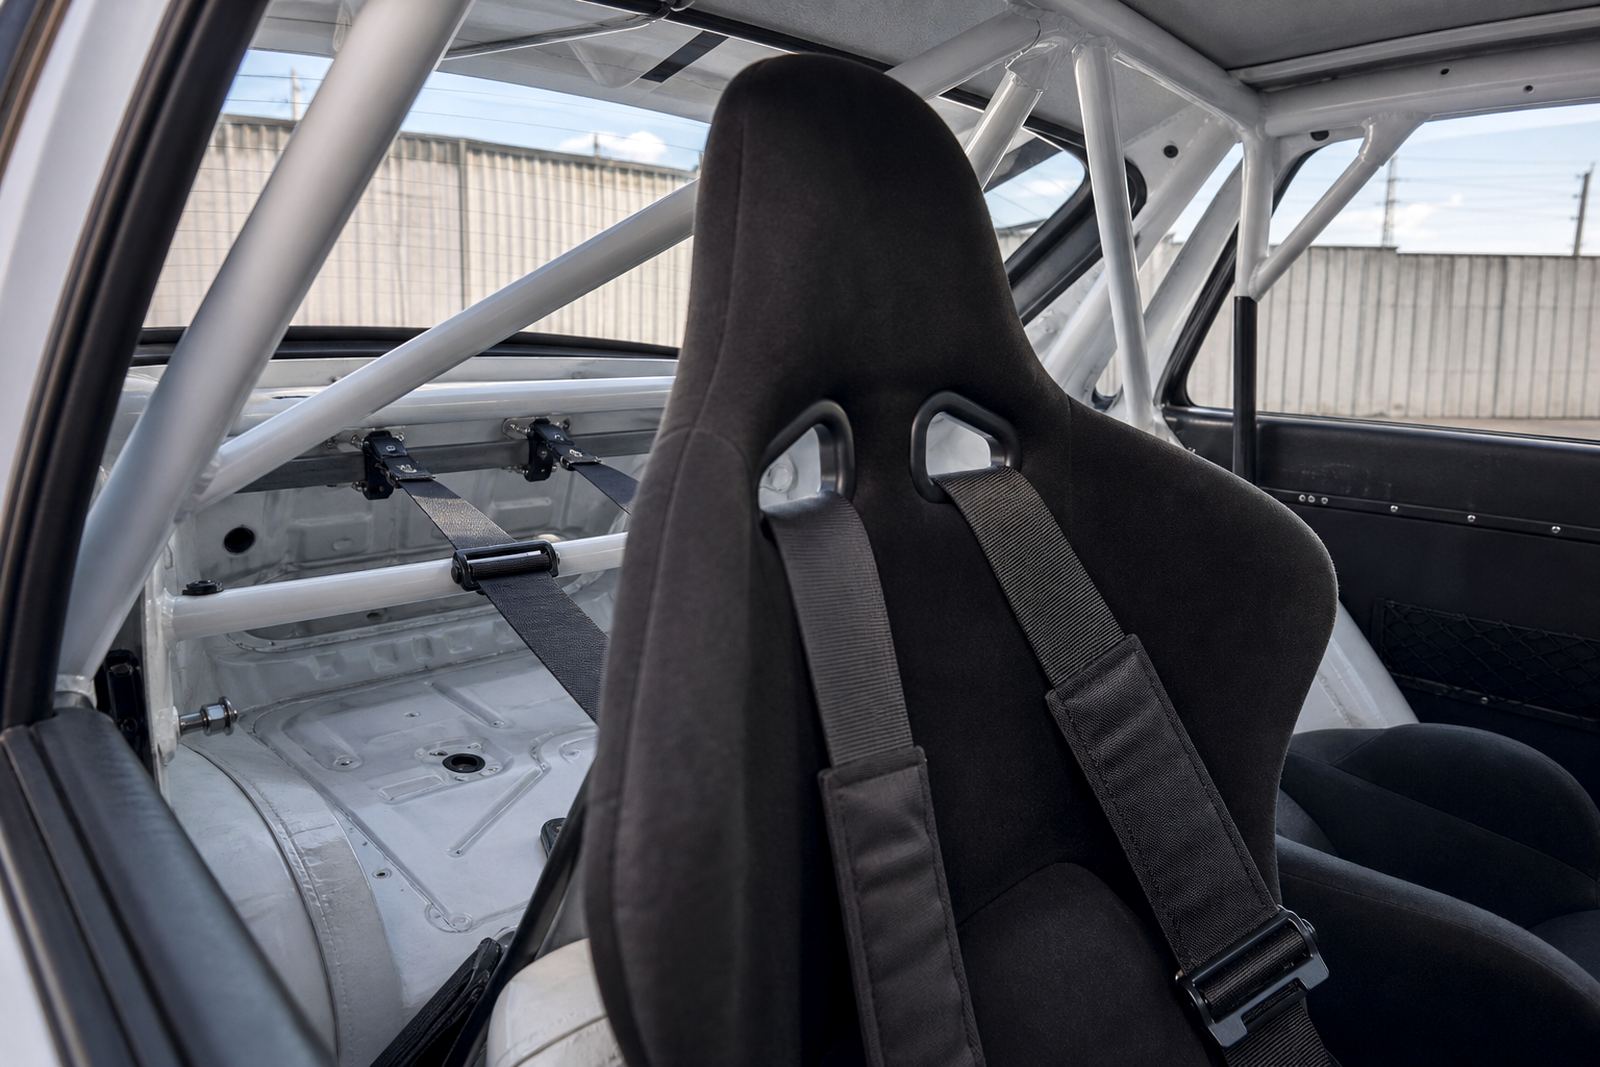
The seat shell matters as much as the harness itself. A deep bucket with pass-through slots sits differently from a flatter seat, and the shoulder belts should leave those openings in a clean line. If the belt angle is wrong the driver can slide forward under hard braking, or feel pinched across the neck and shoulders. That is not just uncomfortable, it changes how the body is held during a hit or a spin.
On cars used around Midrand, Kyalami and Pretoria, we often see a sensible harness fitted onto a seat position that was never checked against the anchor points. That is where the trouble starts. A neat install still needs to match the driver, the seat and the cage or rear mounting points.
Anchor points that do not fight the chassis
Anchor points should be placed so the belts pull in a straight and predictable line. The shoulder straps, lap belts and anti-submarine strap all have different jobs, so each one needs its own position and clearance. A rear anchor that is too low can create a steep belt angle, while one that sits too far back can add slack where you do not want it.
- Shoulder belts must leave the seat slots evenly, with no twisting.
- Lap belts should sit low across the pelvis, not over the stomach.
- Anti-submarine straps need a clean path through the seat base and crotch opening.
- All mountings should clear sharp edges, moving suspension parts and hot exhaust areas.
- Any chassis eyelet or tab should be inspected for proper weld condition and backing support.
We also factor in how the car is run. A rally car on rough roads in Gauteng and the Eastern Cape will move differently from a circuit car at Kyalami. That means the belt hardware, seat mount strength and cabin packaging need to suit the job, not just the rule book on paper.
Seat position comes before belt hardware
If the seat position is wrong, the harness will usually only hide the issue for a while. A driver sitting too upright may need the belts tightened too hard to feel secure, while a seat that is reclined too far can alter the angle of the shoulder straps and reduce the benefit of the anti-submarine strap. The driving position should let the driver hold the wheel, work the pedals and stay planted under braking without fighting the restraint system.
That is why seat positioning and harness fitment checks go together. Before a final setup, we look at helmet clearance, shoulder height, steering wheel reach and where the lap belt crosses the hips. The aim is not a showroom finish, it is a working position that stays sensible when the car is warm, the tyres are loaded and the driver is pushing through a longer session.
In a Midrand workshop bay, this often means small changes rather than big ones. A different seat rail height, a revised shoulder strap route or a better mounting point can change the whole feel of the car. Small changes matter when the driver is spending lap after lap in the same seat.
What to check during a harness fitment check
A proper check is more than tugging on the straps and calling it done. We look at the full restraint layout, including the seat shell, mount condition and how the belts sit when the driver is actually strapped in. If a driver climbs in with gloves on and helmet in place, the setup can feel different from a quick roadside test.
- Check that each buckle and adjuster can be reached without strain.
- Confirm that the belts stay flat across the body under load.
- Look for rubbing on seat edges, cage tubes or trim panels.
- Inspect the mounts for movement, corrosion or sloppy hardware.
- Test the release action so it is easy to operate with racing gloves on.
We also watch for common fitment mistakes such as crossed shoulder straps, uneven lap belt lengths and anchor points that were chosen for convenience instead of line and height. A harness should settle the driver into position, not create a fight every time the car is started.
Track cars, rally cars and the way they load the belts
Different motorsport disciplines ask different things of the same belt set. A circuit car sees repeat braking, kerb strikes and lateral load, while a rally car can spend long periods on rough surfaces with quick direction changes and sudden compression over bumps. The same harness style may be used in both, but the anchor plan and seat setup should not be treated the same.
On track cars, the main concern is repeatable support during hard braking and cornering. On rally cars, belt stability must still be maintained when the chassis moves more than expected. That is why anchor positions, seat shell choice and cage layout need to be discussed together rather than one item at a time.
For drivers travelling between Johannesburg, Durban, Cape Town or Port Elizabeth for events, it also helps when the harness layout is easy to live with during scrutineering and paddock work. A tidy, logical setup saves hassle when the car is being checked, loaded or passed between support crew.
Shoulder strap angles before and after
A driver brought in a club racer from Centurion with a fresh harness, a fixed-back seat and a roll cage already in place. The belts had been fitted, but the shoulder straps dropped too steeply from the seat openings and the lap belts sat higher than they should have. The driver was not badly positioned, yet the whole system felt busy under braking and unsettled in fast direction changes.
After adjusting the seat height, revisiting the rear anchor line and checking the anti-submarine strap route, the position settled properly. The driver sat lower, the harness stayed flatter across the shoulders and the lap belts sat where they should on the pelvis. No single part was dramatic on its own, but together the changes made the car feel organised.
That is the part people miss. Harness angle is not a style choice. It is one part of the driver interface, and it has to work with the cage, seat and floor structure if the car is going to be used seriously.